10 tips for image composition
A photographer decides with which elements he wants to create the picture. The aim is to create a picture as harmonious and appealing as possible. The composition of a picture decides whether a viewer is attracted by a picture or not.
In both landscape and wildlife photography there are a few important basic rules in image composition. Learn to apply these rules, to combine them or to break them consciously. In this blog you will find a selection of possibilities for image composition. Of course, there are also many other possibilities.

“In this picture we concentrated to match the “frame” that the trees perfectly forms with the silhouette of the mountain top.
Fujifilm GFX50S, GF32-64mm f/4, 120s, f/9, ISO 100”
10 Möglichkeiten, Bilder wirkungsvoll zu gestalten
1. Rule of thirds
The image is divided into three parts vertically and horizontally. It is thus divided into nine equally sized areas. Important picture contents, such as the horizon or other striking motifs are preferably positioned at one of the intersection points / fields.
In below two examples, striking picture elements were placed on the third lines. The wild dogs from Africa lies nicely on the right third line. The landscape shot was also ideally designed using the third lines: The foreground lies on the first horizontal line and the horizon on the second horizontal line. In addition, the main motif of the Three Peaks was deliberately placed on the left vertical third line. Both pictures thus appear harmonious.

“Example rule of thirds on Wildlife photography
Nikon D4, 300 mm f/2.8, 1/2000s, f/6.3, ISO 800”

“Example rule of thirds on landscape photography
Nikon D850, 14mm f/1.8, 1/5s, f/11, ISO 100”
2. Fill in the frame
With this rule, you deliberately zoom in as close as possible so that the motif is placed in the image to fill the entire format.
This close-up shot of a lion captivates by the format-filling positioning of the animal. Since disturbing elements are not visible in the surroundings, the king of the animals appears even more imposing. The eye of the viewer can see the motif in detail.

“A classic example of “Fill the Frame” from Botswana
Nikon D850, 180 – 400mm f/4, 1/1000s, f/4, ISO 400”
3. Symmetry
With symmetries you often achieve a fascinating visual effects. The horizon can often be positioned in the middle without disturbing. The symmetry gives a picture calmness and balance. Especially in landscape photography reflections on water surfaces often offers a great motif.
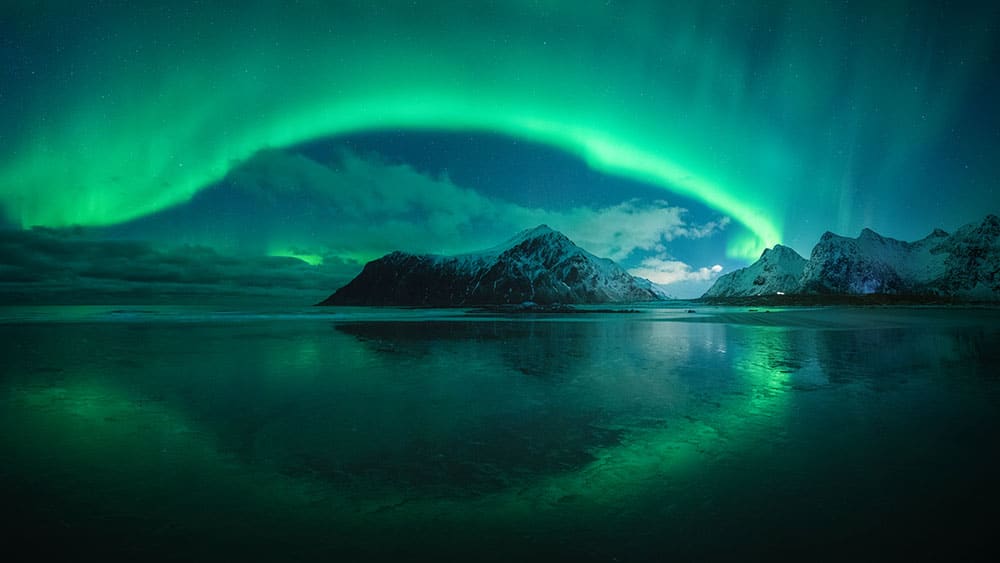
This picture was taken on the Lofoten Islands. The reflection of the mountain range in the small lake gives the picture a unique peace and balance.

Fujifilm GFX50S, GF 23mm f/4, 1s, f/16, ISO 100
4. Natural framing
The subject is surrounded by a natural frame that is already present in the scene. This gives the image more depth and directs the eye directly to the main subject. It also appears self-contained. Disturbing elements in the foreground are not visible through the frame. Many elements are suitable, such as animals, trees, bushes, branches, caves, ice, archways.
These two pictures show the use of framing in wildlife photography. Both the natural frame, the two lions in the foreground and, in the case of the small leopard, the woods in the background give the pictures more depth and the focus is on the two young animals.

Nikon D850, 180 – 400mm f/4, 1/400s, f/5.6, ISO 500

Nikon D850, 180 – 400mm f/4, 1/500s, f/5.6, ISO 1250
5. Complement colours
The colours opposite each other on the colour circle are called complementary colours. For example, green is the complementary colour of red. Combining these two colours creates a great contrast and the image looks appealing. Combining these two colours creates a great colour contrast and the image looks appealing. Especially in nature you often find spectacular colour contrasts.
Bird life is diverse and colourful in Africa. The crimson bee-eaters are shown to their best advantage thanks to the green background.

“Crimson bee-eaters in Botswana. The background glows a beautiful green thanks to the rainy season.
Nikon D500, 180 – 400mm f/4, 1/200s, f/6.3, ISO 2500”
Sunsets can also generate wonderful colour games, as the example from Tuscany shows. After a thunderstorm, the cloud cover was illuminated by the setting sun. Together with the green hill this creates wonderful plays of red and green.

“Sunset in Tuscany
Nikon D850, 24-70mm f/2.8, 0.6s, f/8, ISO 100”
6. Levels
The use of different layers gives the picture more space and depth. When creating a picture, the foreground, middle ground and background should always be taken into account if possible.
When shooting from Slovenia, the ground fog gives more weight to the layers. The viewer is thus drawn directly into the picture and the view is directed to the small church on the hilltop.
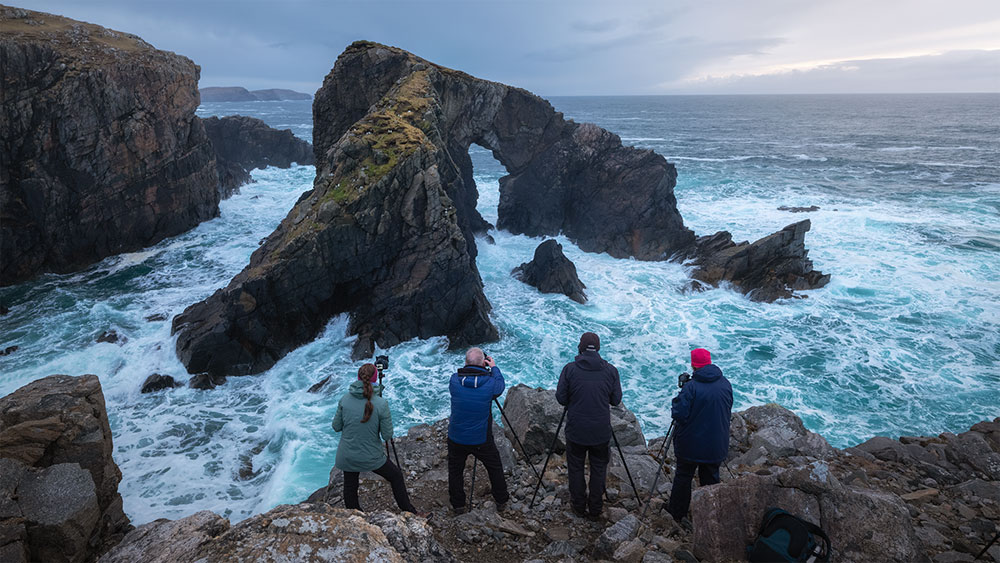
The photograph from the far north is based on the same principle. Here, the rocks were deliberately placed in the foreground. In the photo, additional attention was taken to catch the wave at the moment when it was flowing over the rocks. This increases the contrast on the black rocks and enhances the effect of the level.

Fog landscape in Slovenia
Fujifilm GFX50S, GF120mm f/4, 1/100s, f/8, ISO 100

Coast in Senja, Norway
Fujifilm GFX50S, GF32-64mm f/4, 0.8s, f/14, ISO 100
7. Leading lines
Leading lines are ideal for guiding the viewer’s gaze in the picture and directing attention to the main subject in the shot. So-called Leading Lines can be perfectly integrated when designing a landscape shot. There are many such natural lines in nature: Rivers, paths, rock formations, walls, fences and many more.

A small stream as a leading line, which leads directly to the impressive weather mood on the horizon.
Fujifilm GFX50S, GF32-64mm f/4, 0.5s, f/8, ISO 100

Structures and lines on coastal sections creates perfect guidance lines.
Fujifilm GFX50S, GF23mm f/4, 4s, f/16, ISO 100
8. Negative space
The opposite of “Fill the Frame” is to use negative space in the image composition. To do this, you use a lot of “empty” space around the main motif. The result is a calm and simple picture. The viewer can fully concentrate on the main motif and is not distracted by unnecessary details.
In the case of the castle from Scotland, a lot of negative space was deliberately included in the picture. Thus the picture conveys a great deal of calm. One can linger nicely and really feel the quiet atmosphere during the sunset.

Castle Stalker Scotland
Fujifilm GFX50S, GF32-64mm f/4, 120s, f/13, ISO 100
The picture of the kingfisher in Botswana leaves the object enough space to look out into the picture. The calm green background gives the perfect negative space.

Kingfisher in Botswana
Nikon D850, 180 – 400mm f/4, 1/640s, f/5.6, ISO 800
9. Depth of Field
The depth of field also allows an image to be selectively shaped. For example, the main subject or important elements in the image can be brought into focus by using an open aperture. The subject is thus separated or isolated from the foreground or background. This method is suitable for both landscape and wildlife photography.
In this example, the background is out of focus due to the open aperture. The eye is directed to the beautiful portrait of the bird and the blurred background does not distract unnecessarily.

Brown-eared Aracari in the Pantanal, Brazil
Nikon D500, 500mm f/5.6, 1/400s, f/5.6, ISO 1600
In landscape photography you can also play consciously with sharpness / blur. In this photograph the flower meadow in the foreground was blurred by an open aperture. Thus the focus is on the main motif with the curved road and the agriturismo.

Agriturismo in Tuscany photographed with open aperture.
Nikon D850, 24-70mm f/2.8, 1/640s, f/2.8, ISO 100
10. Pay attention to disturbing elements
Disturbing or unnecessary elements in the picture should be avoided. Look carefully through the viewfinder and watch out for disturbing elements. It is important that the background and edges of your picture are kept as simple as possible and do not unnecessarily distract from the main subject.
In wildlife photography, disturbing elements can be, for example, tree trunks growing out of the animals’ heads, other animals disturbing the silhouette of the subject or the horizon line breaking through the silhouette of the animal. This example of an elephant at the Chobe River in Botswana shows this beautifully. On the left side you can see other elephants in the background, breaking the silhouette of the elephant. In such a case you just wait until the elephants in the background have moved on or try to change the location of the safari vehicle.

Elephants in the background disturb the silhouette of the main motif
Nikon D850, 24-85mm f/3.5-4.5, 1/2000s, f/8, ISO 640

The same motif, without disturbing elements behind the elephant
Nikon D850, 24-85mm f/3.5-4.5, 1/2000s, f/8, ISO 640
In landscape photography, too, one should make sure that no unnecessary elements distract the viewer’s attention. These can be trees and plants, stones, power lines, etc. that have been cut for example. In this example you see on the left side in the corners unsightly elements like a small part of a shrub or bright spots in the stone. These direct the view immediately away from the main motif. Here it simply helps to zoom in a little bit more and let these elements simply disappear from the picture. On the right, the example with the slightly adjusted image detail.

Trimmed plants or untidy picture elements in the corners often distract the viewer’s attention.
Nikon D850, 24-70mm f/2.8, 5s, f/9, ISO 100

The same motif with adjusted frame. The picture immediately appears calmer and “tidier”.
Nikon D850, 24-70mm f/2.8, 8s, f/13, ISO 100
Conclusion
The rules listed here are not conclusive and are not always mandatory. It is rather a matter of learning which design elements can be observed and how they can be applied to create a captivating visual effect. The tips can also be combined. And breaking the rules from time to time should not be forgotten either. We wish you a lot of fun with the application and a lot of good light.