6 tips for bad weather photography
There is (almost) no such thing as bad weather for photography! A cloudless sky often looks boring. It becomes interesting when the weather is changeable. A landscape shot looks different on a clear day, in stormy weather, in fog or in snow. There are many photo motifs that are more effective in challenging lighting conditions. For example, exciting contrasts are created, or the shots get more drama.
Let our bad weather photo tips inspire you!
The tips
1.Pack the right equipment!
First and foremost, it is important that you dress yourself in such a way that you stay dry and do not freeze. The following checklist will help you pack the right equipment:
- Cold and/or water-resistant clothing (rain gear, rain pants, headgear, etc.) and umbrella.
- Pack camera equipment weatherproof (backpack with rain cover).
- Microfiber cloth for the lens to clean water drops and splashes in front of the lens, dish towel to dry wet equipment.
- Use a sun visor, this additionally protects the lens from the rain.
- Use rain cover for camera and lens or simply cut open a zip / plastic bag and use that.
- Pack a tripod – the sparse light conditions require slower shutter speeds. Don’t forget the remote shutter release.
- Polarizing filter to eliminate unwanted reflections and mirroring.
- Gray filter for slow shutter speeds for waterfalls and streams.

Storm weather on Senja, Norway
Fujifilm GFX 50S, 32 – 64mm f/4, 0.8s, f/14, ISO 100
2. Choose a suitable subject according to the lighting conditions
Rain and gloomy clouds can create a perfect weather to take great shots of streams and waterfalls. Contrasts are low and you can achieve a nice smear effect by using slow shutter speeds.
Landscape shots of lakeshores or mountain peaks, for example, can also produce dramatic moods in such weather. Another suitable bad weather subject are photos of/in forests. In autumn, for example, the fog can give the forest a mystical mood. The autumn colours on leaves glow especially intensely!
- Extra tip: To eliminate reflections and mirroring from wet surfaces such as leaves, a polarizing filter works well.
Ideas for great motifs in bad weather
- Mystical forest scenes
- Waterfalls and streams
- Long-time exposures of waters (rivers, streams, lakes)
- Animals in rain or with cloudy sky
- Landscapes immediately before or after thunderstorms
- Storm clouds at sunrise and sunset
- Storm clouds or gloomy mood by day
- Waves and wind
- Fog scenes
- Mirroring and reflections in lakes

Foggy atmosphere in Wicklow, Ireland
Nikon D850, 24 – 70mm f/2.8, 1.6s, f/8, ISO 100
3. Be patient and wait for better times
Even on days with dense cloud cover, the sun can suddenly break through the cloud layer. Fantastic light scenes can also occur before or after a violent thunderstorm. The dust particles are washed out of the air after the thunderstorm and the landscape appears clear. Green areas now shine particularly intensively. If you are lucky, even a rainbow will appear in these weather conditions, as the sunlight is refracted by the water droplets of the rain.

Spectacle of light in the sky, after three hours of continuous rain and shortly before sunset, Canton Zug, Switzerland
Fujifilm GFX 50S, 32 – 64mm f/4, 2s, f/16, ISO 100
4. Photograph in the blue hour
Gray skies often mean grey light. Of course, this is not only optimal for landscape photography. If you shoot in bad weather, especially in the off-peak hours in the morning and evening, the light takes on a blue tint through the twilight. This bluish light adds even more dynamics to a stormy scene with gloomy clouds.

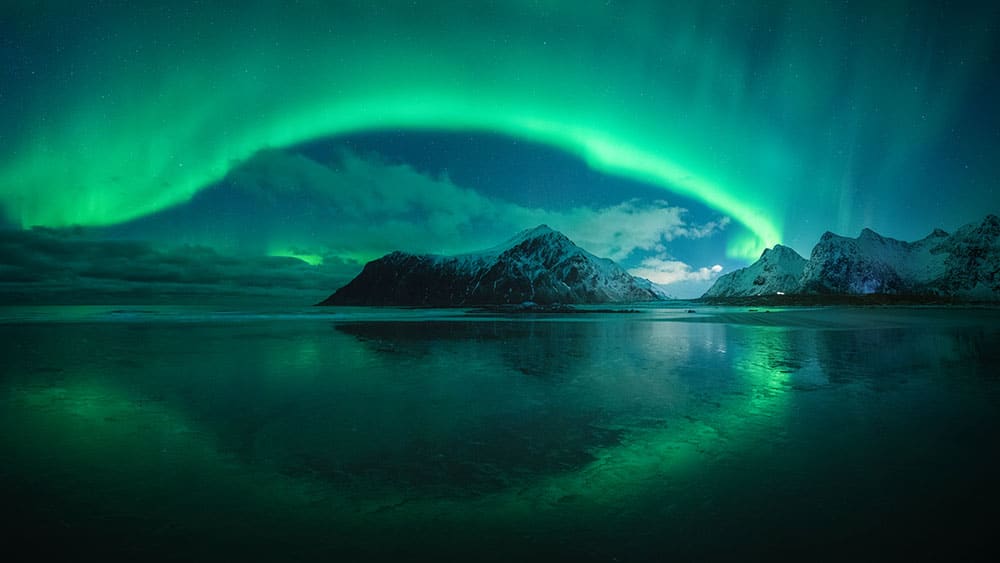
Blue hour on the Lofoten Islands, Norway
Fujifilm GFX 50S, 23mm f/4, 120s, f/16, ISO 100
5. Play with the exposure time
Especially in bad weather with rain, you have many design options. For example, you can use a fast shutter speed to freeze the raindrops in the image or use a slow shutter speed to create “lacing rain”.
To make the raindrops clearly visible in the picture, you should shoot against the light.
Use a slow shutter speed for waterfalls and streams. This creates a beautiful wiping effect. The water will be soft and flowing.

Thundering stream in the canton of Bern, Switzerland
Fujifilm GFX 50S, 23mm f/4, 1/8s, f/16, ISO 200

After the rain, rivers carry much more water
Fujifilm GFX 50S, 32 – 64mm f/4, 1/4s, f/8, ISO 640
6. Use the right camera settings
- Choose the right shutter speed depending on the desired effect – long or short.
- Use the tripod – with it you can use a closed aperture (large depth of field) even in gloomy weather.
- Choose the ISO sensitivity as low as possible.
- Shoot in RAW format if possible. This way you can get the best out of the image! Especially more contrast and richer colors.
- Play with the exposure compensation – if you underexpose a scene, it will be more dramatic / if you overexpose, the image will appear more friendly.

Skagsanden, Lofoten Inseln Norwegen
Fujifilm GFX 50S, 23mm f/4, 120s, f/8, ISO 200

Schneesturm im Anflug auf den Lofoten Inseln, Norwegen
Fujifilm GFX 50S, 32 – 64mm f/4, 2.5s, f/11, ISO 100