Photographing waterfalls
So simple is that!
Who doesn’t know this feeling: you are out and about in nature and suddenly find yourself in front of a roaring waterfall. You are immediately drawn into its spell. The sound of the water hums in your ears and the spray seems to wrap the surroundings in a fairy tale-like dress.
In this article we will show you how you can skilfully set the scene for waterfalls and capture beautiful images.

Fairy Pools Isle of Skye, Scotland
Nikon D810, 14 – 24mm f/2.8, 10s, f/8, ISO 100, Grey and gradient filters
The veil effect – just the way you like it
When you shoot flowing water with slower shutter speeds, you get a beautiful, velvety soft haze effect. Since the shutter of your camera is open longer, the movement of the water is captured. The slower your shutter speed, the softer and whiter the veil effect. If you want to “freeze” the water and not create a veil effect, use a very fast shutter speed, e.g. 1/1000s. Try different shutter speeds and find out which one suits your taste.
The right equipment for waterfall photography
Camera
You don’t necessarily need a high-end camera. In principle, it is sufficient if the exposure time can be set manually.
Objective lens
Various focal lengths are suitable for waterfall photography. Especially great shots can often be captured with a wide-angle lens.
Batteries
Remember to take enough spare batteries for the camera. Longer shutter speeds will drain the batteries faster.
Tripod
To capture the beautiful veil effect of the waterfalls, you need to work with slow shutter speeds. Therefore, you need a stable and robust tripod. Ideally, your tripod has rubber covers on the feet. This way you can also put it in the water.
Remote shutter release
A remote shutter release prevents blurry / out-of-focus images that can result from pressing the shutter button on the camera. If you don’t have a remote shutter release, you can also use your camera’s self-timer function.

Killarney National Park Co. Kerry, Ireland
Nikon D850, 24 – 70mm f/2.8, 8s, f/8, ISO 100

Wicklow Mountains Co. Wicklow, Ireland
Nikon D850, 20mm f/1.8, 1s, f/9, ISO 200
Gray filter / Graduated filter
The gray filter reduces the amount of light that falls through the lens onto the image sensor. It helps you to use slower shutter speeds in daylight. The longer you can expose, the softer the haze effect will be. We recommend you use a grey filter with at least -6 f-stops (also called Little Stopper) in daylight or a Big Stopper (-10 f-stops) in high light.
If you want to photograph the waterfall during sunset, we recommend a graduated filter. This will darken the sky in relation to the foreground or compensate for strong differences in brightness between the sky and the landscape.
With the polarizing filter you can make unwanted reflections on the water disappear.

Soča-Tal, Slovenia
Fujifilm GFX 50S, 32 – 64mm f/4, 3s, f/8, ISO 500
Protection from wind and weather
Depending on the location, but also the larger the waterfall is or the closer you are to it, you should have water-repellent clothing (rain protection, rain pants, headgear, etc.) and umbrella. Also pack your camera equipment accordingly and use a photo backpack with rain protection.
It’s also recommended to pack waterproof shoes or even rubber boots with good tread soles. Sometimes you get a great image composition when you shoot directly from the water.
Take a microfiber cloth with you to clean water drops and splashes in front of the lens. A dish towel helps to wipe wet equipment dry.
Use a sunshade, this will help protect the lens from water splashes.
As rain protection for your camera and lens you can simply use a cut open zip / plastic bag.
Checklist – equipment for photographing waterfalls
- Camera & Lenses
- Enough batteries
- Sturdy tripod
- Remote shutter release
- Gray filter / Graduated filter
- Polarizing filter
- Rain cover / umbrella
- Microfiber cloth / dish towel
- Plastic bag to protect the camera

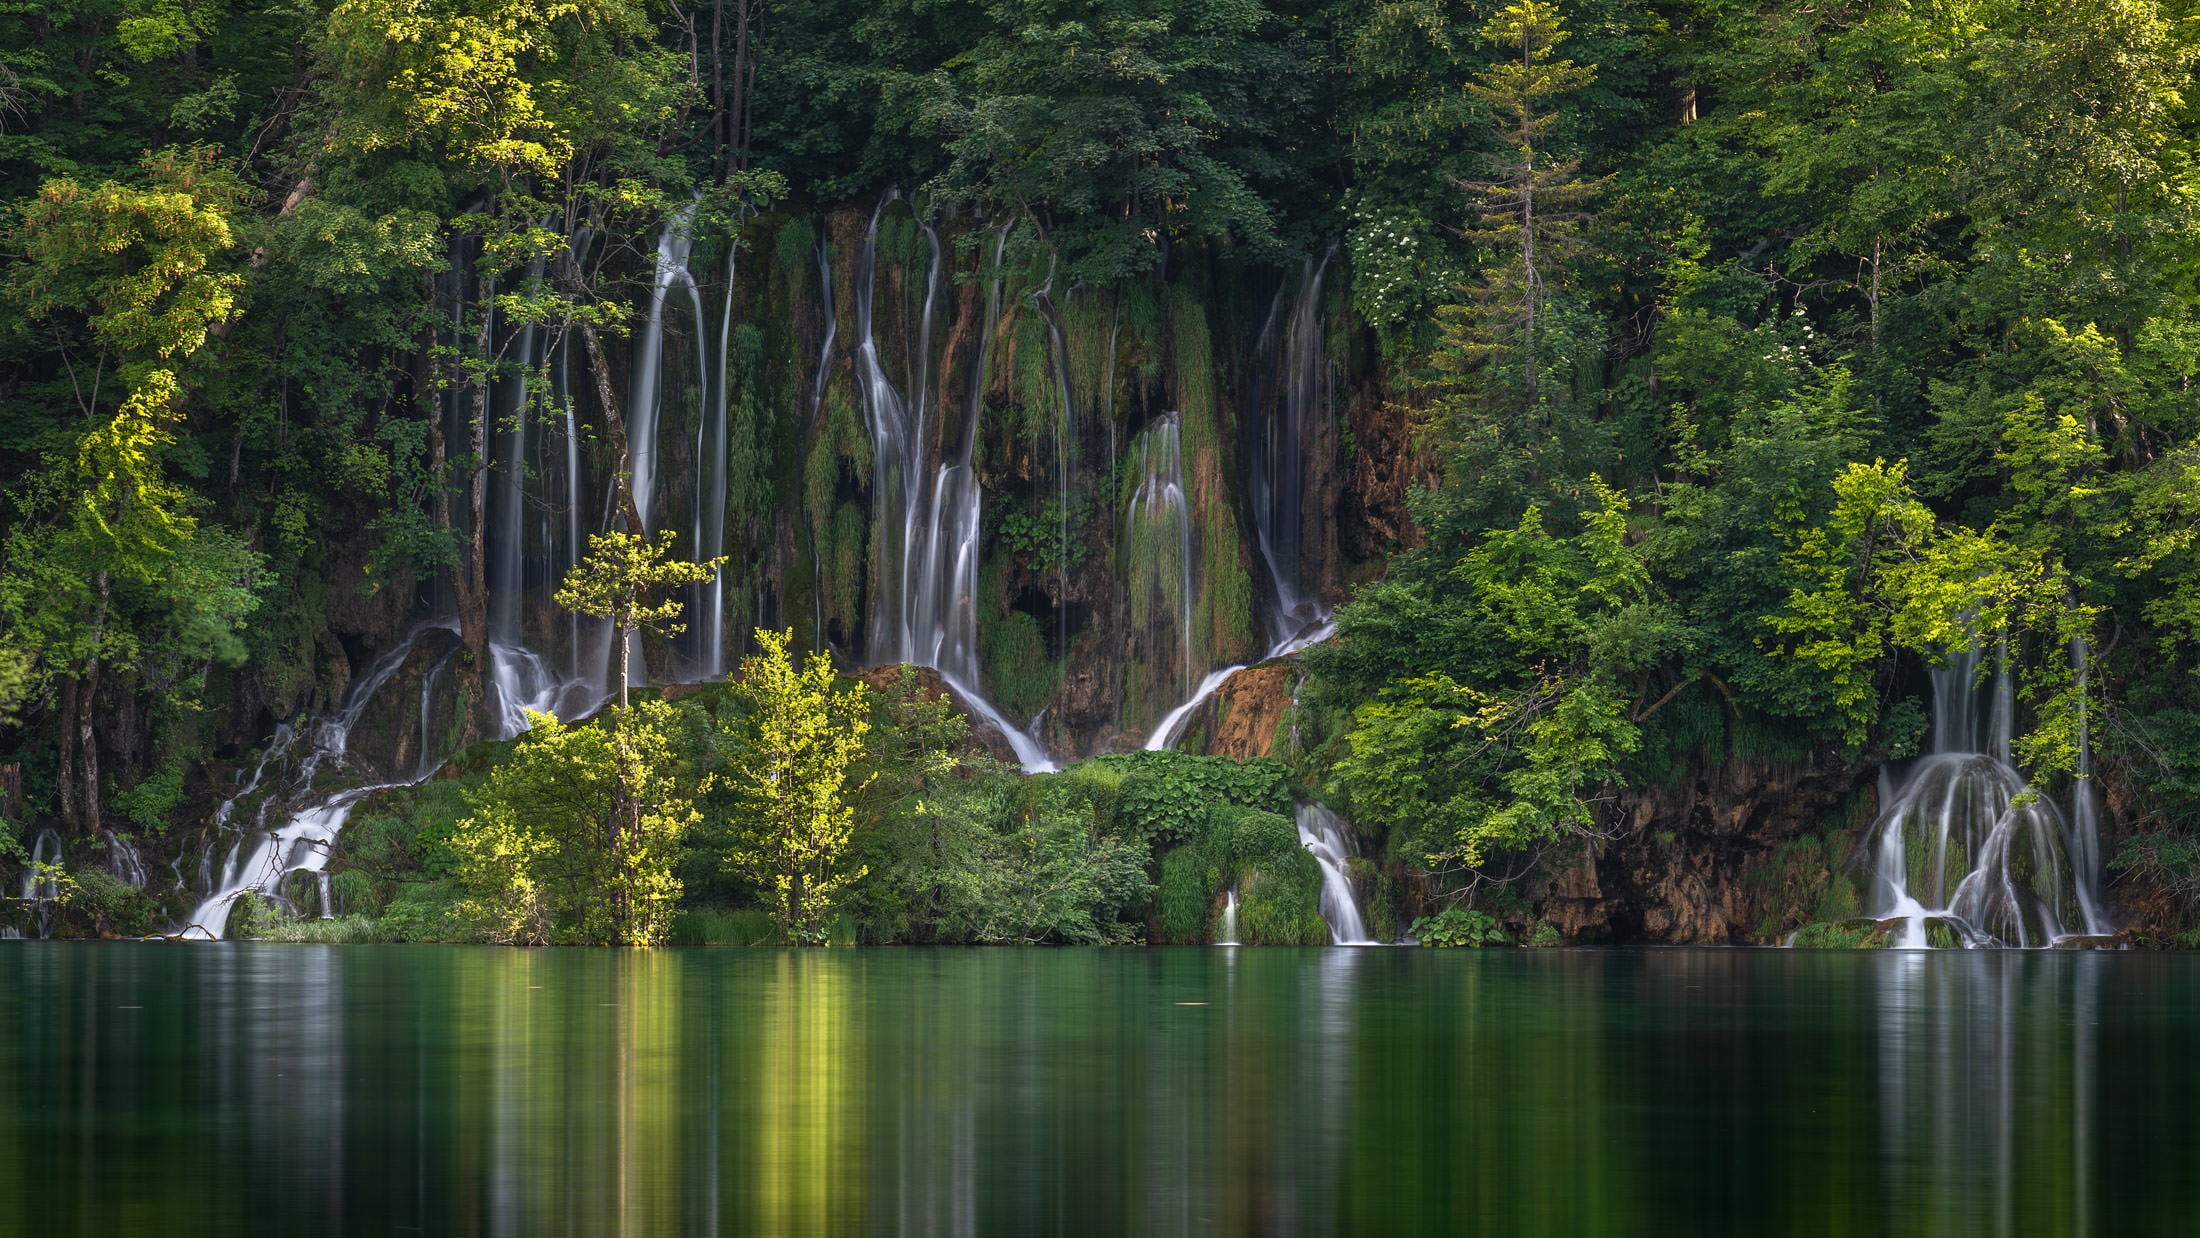
Plitvice National Park, Croatia
Nikon D850, 20mm f/1.8, 1/3s, f/11, ISO 100
5 steps to top waterfall photos
The following instructions will help you capture great shots of waterfalls.
1. Take advantage of the ideal weather or shoot at the right time of day
When photographing waterfalls, you must make sure that there is not too much light.
To get the beautiful veil effect, you need to work with slow shutter speeds. If you are standing by a waterfall in the middle of the day and the sun is reflecting strongly on the water surface, it is almost impossible to work with slow shutter speeds.
Bad weather is perfect for great waterfall shots. Due to the overcast sky, there is little light, and you can shoot very well with slower shutter speeds. If the waterfall is located in a forest, where is little light, you can also photograph well during sunshine. However, avoid midday here as well. As then the sun is high above and the sunlight reflects from the leaves of the trees.
Time around sunrise or sunset is also suitable for photographing waterfalls. If you are lucky, you can capture your waterfall together with great colours in the sky.
2. Choose a captivating image composition
Take enough time to compose the image. Think about how you want to position the waterfall in your shot. Try to achieve the most exciting composition
Integrate an interesting foreground in your image. Try to give the image more
In addition to the foreground, try to look for special lines and shapes. They give the photo more expressiveness and guides the eye of the viewer
Spectacular shots can also be made when you place a person in the picture. This is especially suitable to show proportions. The viewer can be shown how big the waterfall is.

Connemara Co. Mayo, Ireland
Nikon D850, 24 – 70mm f/2.8, 8s, f/13, ISO 100

Plitvice National Park, Croatia
Nikon D850, 70 – 200mm f/4, 2s, f/8, ISO 200
3. These camera settings are half the success
- Manual mode: Set the manual mode of your camera. This allows you to set both aperture and shutter speed manually.
- Image quality on RAW format: This allows you to edit the image optimally afterwards.
- Turn off image stabilizer: If your lens has a stabilizer, always turn it off when shooting with a tripod.
- Mirror lock-up: If you are using an SLR camera, switch on the mirror lock-up. Otherwise, releasing the mirror can also cause slight camera shake.
- ISO: Use an ISO value as low as possible to prevent unwanted noise. It’s best to start with ISO 50 or 100.
- Aperture: Set the desired aperture. For landscape shots, it is best to choose an aperture between f11 and f16. In this range, you often achieve the best sharpness. The smaller the aperture, the less light falls on the sensor and the slower the shutter speed.
- Depending on how much ambient light is present or how fast the water is flowing, the time changes. Basically, you can achieve the effect with 1 – 2 seconds. Try different shutter speeds from 1 – 15 or even 30 seconds. You will see how the appearance of the flowing water changes in each case.
- Shutter speed: To get the beautiful veil effect of flowing water, you need to set a slightly slower shutter speed. Depending on how much ambient light is present or how fast the water is flowing, the time changes. Basically, you can achieve the effect with 1 – 2 seconds. Try different shutter speeds from 1 – 15 or even 30 seconds. You will see how the appearance of the flowing water changes in each case.
- Manual focus: If there is not enough light for autofocus, we recommend that you focus manually. Our tip: Set your lens to infinity and use the live view function of your camera. Enlarge the image section and look for an object where the focus can be easily determined: for example, edges of stones, tree trunks or edges of leaves. By turning the focus ring, you can now adjust the sharpness manually.
- Cover the viewfinder: Light can also fall on the sensor through your camera’s viewfinder. Cover the viewfinder as soon as you work with slow shutter speeds.

Canton of Zug, Switzerland
Fujifilm GFX 50S, 23mm f/4, 1s, f/8, ISO 400
4. Set the filter
Once you have set all the camera settings, the only thing missing now are the filters. Use different filters depending on the image composition and ambient light:
- Gray filter: when the sky is overcast, close-up of a waterfall or stream without much sky or deep in the forest with little light
- Gray filter + graduated filter: for high contrast / dynamic range and or you have integrated the sky in your composition
- Polarizing filter: use the polarizing filter if you want to prevent reflections.
Our tip: photograph without filters
If you don’t have a filter (yet), you can try to achieve the veil effect without a filter in gloomy weather or low ambient light. Just make sure that as little light as possible falls on your sensor: ISO as low as possible (e.g. 50 or 100) and close the aperture completely (e.g. f/22). With these settings you can’t use very slow shutter speeds, but often it is possible to choose a shutter speed of about 1 second. This is already enough, especially with fast flowing water, to achieve an effect.
5. Trigger and check histogram
After you have set everything correctly, you can release the camera. Then check the histogram to see if the exposure is correct.

Plitvicer Lakes, Croatia
Nikon D850, 24 – 70mm f/2.8, 1/4s, f/11, ISO 100

Soča-Tal, Slovenia
Nikon D850, 24 – 70mm f/2.8, 1.3s, f/11, ISO 100